

INTEL 760P

三星 SM951 官方標示速度
讀取2150M
寫入1550M
INTEL 760P 官方標示速度
讀取3210M
寫入1315M
四年前買第一個NVME SSD SM951想說跑這樣正常
後來又買了INTEL 760P 速度也是被限制在1500M左右
連這兩天新買的美光P5也是被限制在1500M左右

對這個問題一直很悶,感覺可能是雙核心U不夠力
問題這台NUC又是跑PCIE 3.0 x4................就這樣陸續用了幾年沒去管了
直到最近有空爬國外文,發現有人說這台NUC6被限制在1600M.........
再往下看有人提出解決方法了

首先去INTEL翻說明書BIOS Update and Recovery Instructions for Intel® NUC
載點 : BIOS Update Instructions for Intel® NUC with Intel® Visual BIOS (PDF)
其中第10頁提到使用安全跳線還原BIOS
BIOS Recovery by the Security Jumper
此方法會清除你的TPM , PTT 和 HDCP keys 資料....
Note: Note: BIOS recovery using the BIOS security jumper will clear Trusted Platform Module (TPM) keys, Intel® Platform Trust Technology (Intel® PTT) keys, and High-bandwidth Digital Content Protection (HDCP) keys. These keys will not be restored after the BIOS recovery.
接下來按表操課
1.Download the Recovery BIOS (.bio) file. Example:
下載你的NUC BIOS像我是NUC6I5SYH 最新的是SY0072
2.Copy the recovery file (*.bio) to a USB device.
複製SY0072.bio到FAT32格式的隨身碟
3.Shut down the computer and unplug the AC power adapter.
關機移除電源插頭
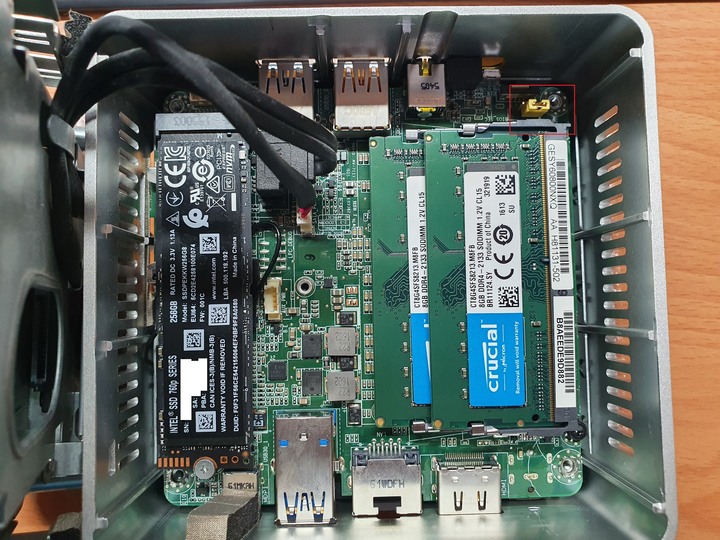
4.Open the chassis and remove the BIOS security jumper. (See the Technical Product Specificationfor details including the location of this jumper.)
打開機殼,拔掉黃色跳線
5.Plug the USB device into a USB port of the target computer and turn it on.
插上USB隨身碟然後開機
6.Wait 2-5 minutes for the recovery process to complete.
等待幾分鐘後完成
7.The computer will either turn off when the recovery process is complete,or it will prompt you to turn it off.
看到這樣就是完成了,可以關閉電源,裝回黃色JUMP

開機F2進BIOS 在按F9恢復成預設
然後設定一下再按F10儲存,重新開機
終於解決了


