![[模型製作記] 福斯金龜車 1/24](https://attach.mobile01.com/attach/202410/mobile01-a5895d944b98bbde027ee3df16b6bf67.jpg)
車車的世界中大家都知道的一輛經典款,非常的可愛,直接讓人感受到那個年代的汽車樂趣,簡單又時髦,即使馬力不大就算油門踩緊繃可能只會慢慢爬,有興趣的可參考下列連結
https://zh.wikipedia.org
模型是田宮所出品的1966年車型。
![[模型製作記] 福斯金龜車 1/24](https://attach.mobile01.com/attach/202410/mobile01-144e5c7b28cf14a9336f15eb8d7958eb.jpg)
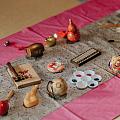
模具是90年代的產品,算是有點粗糙,表現普通沒什麼特點,模型本身有含引擎與前行李箱內構,有很大的改造潛力,但也是種累贅。
![[模型製作記] 福斯金龜車 1/24](https://attach.mobile01.com/attach/202410/mobile01-bf93edeb50a789a2345e9380dd946a75.jpg)
分模線一定有。
![[模型製作記] 福斯金龜車 1/24](https://attach.mobile01.com/attach/202410/mobile01-2aa87147e8abf505763dc5e77241f177.jpg)
從頭到尾、左右兩邊。
![[模型製作記] 福斯金龜車 1/24](https://attach.mobile01.com/attach/202410/mobile01-68a4ae3e0eceb9aff37d000296894493.jpg)
補一補、磨一磨。
![[模型製作記] 福斯金龜車 1/24](https://attach.mobile01.com/attach/202410/mobile01-cccd7b9c7c13eb796c7a6d930bb0e064.jpg)
尻一尻,有平就好,洗一洗待乾等上水補土。
![[模型製作記] 福斯金龜車 1/24](https://attach.mobile01.com/attach/202410/mobile01-eb4a6a4e206e0c73de3a9b6ee93f79c6.jpg)
底盤、座艙組合一下。
![[模型製作記] 福斯金龜車 1/24](https://attach.mobile01.com/attach/202410/mobile01-1c853fd84e22fce862eb192dc96e2a85.jpg)
上個灰色水補土整理一下。
![[模型製作記] 福斯金龜車 1/24](https://attach.mobile01.com/attach/202410/mobile01-39092511b477349461c85d712c6ccde9.jpg)
底盤內裝完成。
![[模型製作記] 福斯金龜車 1/24](https://attach.mobile01.com/attach/202410/mobile01-6c8b7d3df7d170012e7b0af3cd4ee01a.jpg)
車殼洗乾淨後上水補土。
![[模型製作記] 福斯金龜車 1/24](https://attach.mobile01.com/attach/202410/mobile01-05ee21f2e3cf3365d4531c17a35cb59a.jpg)
檢查一下,有缺陷就磨一下。
![[模型製作記] 福斯金龜車 1/24](https://attach.mobile01.com/attach/202410/mobile01-67fbaae1a2f9d2092887d0326dac986d.jpg)
順給他平就好。
![[模型製作記] 福斯金龜車 1/24](https://attach.mobile01.com/attach/202410/mobile01-01782535723c9adb65072502b64e5cc0.jpg)
上白色。
![[模型製作記] 福斯金龜車 1/24](https://attach.mobile01.com/attach/202410/mobile01-f906bb63c4cd8adbc8eef6e4e2552d3e.jpg)
上珍珠白。
![[模型製作記] 福斯金龜車 1/24](https://attach.mobile01.com/attach/202410/mobile01-b8ff94844219433875f66f6cd22f3430.jpg)
珍珠白。
![[模型製作記] 福斯金龜車 1/24](https://attach.mobile01.com/attach/202410/mobile01-21d36db4234ace5c05823ffb716919a4.jpg)
珍珠白。
![[模型製作記] 福斯金龜車 1/24](https://attach.mobile01.com/attach/202410/mobile01-6e1283eae0efddcae2ac4179adc6a6ba.jpg)
上薄薄的一層亮光漆。
![[模型製作記] 福斯金龜車 1/24](https://attach.mobile01.com/attach/202410/mobile01-ea4c8bb7854c73768f30efdb4db42634.jpg)
上金油。
![[模型製作記] 福斯金龜車 1/24](https://attach.mobile01.com/attach/202410/mobile01-41860cb0bb4be9794de23ecc195917aa.jpg)
正常厚度有亮就好。
![[模型製作記] 福斯金龜車 1/24](https://attach.mobile01.com/attach/202410/mobile01-30f79c4af600308a24a1068dec1eb888.jpg)
不要太厚。
![[模型製作記] 福斯金龜車 1/24](https://attach.mobile01.com/attach/202410/mobile01-b3d2371b8f3ca8342072faf35062160b.jpg)
因為後續還有鍍鉻飾條要處理。
![[模型製作記] 福斯金龜車 1/24](https://attach.mobile01.com/attach/202410/mobile01-243ab3f24c6357e946a9e1f68875255f.jpg)
車殼等乾的時後來處理一下鍍金零件,先泡漂白水退一下鍍金。
![[模型製作記] 福斯金龜車 1/24](https://attach.mobile01.com/attach/202410/mobile01-b91f21200bb403c1b61be2f6f0ab6c1b.jpg)
退完鍍金還有一層亮光漆要退,就是看起來黃黃的那個東西。
![[模型製作記] 福斯金龜車 1/24](https://attach.mobile01.com/attach/202410/mobile01-bf9ea1ace011b95d6fa8922ded2af3b1.jpg)
輪框先噴白色,遮蓋後再噴黑色。
![[模型製作記] 福斯金龜車 1/24](https://attach.mobile01.com/attach/202410/mobile01-f66b5161c5b3b1aa0b8dac9afd935d22.jpg)
鍍鉻飾條前先遮蓋一下,銀色汙染力很強,盡量全包覆。
![[模型製作記] 福斯金龜車 1/24](https://attach.mobile01.com/attach/202410/mobile01-b470b930bdf0e9109cb20e204fa3a58f.jpg)
噴完後拆開看看,如果有小小溢漏可以用溶劑擦除。
![[模型製作記] 福斯金龜車 1/24](https://attach.mobile01.com/attach/202410/mobile01-dfc54ecda6f4208378046c10712f5a8c.jpg)
如果翻車就用溶劑擦除搓掉再來一次。
![[模型製作記] 福斯金龜車 1/24](https://attach.mobile01.com/attach/202410/mobile01-2daa4fc0cbca14eb3dfd16abe8836086.jpg)
因為先前以噴過金油當底,現在用硝基係溶劑也不用怕咬底下的漆面。
![[模型製作記] 福斯金龜車 1/24](https://attach.mobile01.com/attach/202410/mobile01-ab241c804d8c5947e221a95dd246d120.jpg)
養漆期間把窗框遮蓋噴一下。
![[模型製作記] 福斯金龜車 1/24](https://attach.mobile01.com/attach/202410/mobile01-8aa4bb39528d02fc1043c0f3cfeca15a.jpg)
養漆後推亮。
![[模型製作記] 福斯金龜車 1/24](https://attach.mobile01.com/attach/202410/mobile01-3e45b4b0a42c2c334a54dad342cca82c.jpg)
盡量推。
![[模型製作記] 福斯金龜車 1/24](https://attach.mobile01.com/attach/202410/mobile01-66656b1683a15ada30206a631f9876bf.jpg)
有電動就用電動推。
![[模型製作記] 福斯金龜車 1/24](https://attach.mobile01.com/attach/202410/mobile01-b6acbe90f0d1bd28f83b8e2ddda8c346.jpg)
沒電動就用手推。
![[模型製作記] 福斯金龜車 1/24](https://attach.mobile01.com/attach/202410/mobile01-3c01c3e2a5ed9e03ee459a0a44c9ac21.jpg)
盡量推。
![[模型製作記] 福斯金龜車 1/24](https://attach.mobile01.com/attach/202410/mobile01-cb36d6b54b64966baf5260cd847d56fe.jpg)
努力推。
![[模型製作記] 福斯金龜車 1/24](https://attach.mobile01.com/attach/202410/mobile01-4fe692873ee54bb4246d9cf279640391.jpg)
每個角度都要。
![[模型製作記] 福斯金龜車 1/24](https://attach.mobile01.com/attach/202410/mobile01-24795e32cac38696aaea973107520868.jpg)
越亮越好。
![[模型製作記] 福斯金龜車 1/24](https://attach.mobile01.com/attach/202410/mobile01-d39453fe7c8bbcd92b84ab3a8e61163d.jpg)
車殼裡面塗黑,免得以後漏光。
![[模型製作記] 福斯金龜車 1/24](https://attach.mobile01.com/attach/202410/mobile01-ca43e0db6583995917d0ae690427f7f3.jpg)
底盤開始組裝。
![[模型製作記] 福斯金龜車 1/24](https://attach.mobile01.com/attach/202410/mobile01-daeb4376dbac859f19e9761b4ce23e4d.jpg)
組一下。
![[模型製作記] 福斯金龜車 1/24](https://attach.mobile01.com/attach/202410/mobile01-1155a8d4e7bf31ebc56fe80b541782b2.jpg)
車殼組裝。
![[模型製作記] 福斯金龜車 1/24](https://attach.mobile01.com/attach/202410/mobile01-9b6d4682be991da030d9539007fd683d.jpg)
零件拿來豆一豆。
![[模型製作記] 福斯金龜車 1/24](https://attach.mobile01.com/attach/202410/mobile01-232f9fff34bb5eaab6d247c4c012feac.jpg)
要小心別用快乾。
![[模型製作記] 福斯金龜車 1/24](https://attach.mobile01.com/attach/202410/mobile01-f814fe335611843bf8662a7e13c5c26b.jpg)
不然溢膠很麻煩。
![[模型製作記] 福斯金龜車 1/24](https://attach.mobile01.com/attach/202410/mobile01-2b36871641a63e1f6a59836dd72c2b7d.jpg)
快乾也有可能白霧對透明件很危險。
![[模型製作記] 福斯金龜車 1/24](https://attach.mobile01.com/attach/202410/mobile01-b04dcd0f63bab4d93416bbdda7e967ec.jpg)
用那個G膠。
![[模型製作記] 福斯金龜車 1/24](https://attach.mobile01.com/attach/202410/mobile01-3ce0861a4f5a990a95efdb41b7e4bc4a.jpg)
最後。
完工進棚拍照。
![[模型製作記] 福斯金龜車 1/24](https://attach.mobile01.com/attach/202410/mobile01-e9c40234df10b3cf5c4430606d7cb99d.jpg)
![[模型製作記] 福斯金龜車 1/24](https://attach.mobile01.com/attach/202410/mobile01-4f3f47edc441113200d56d535bf4dbc9.jpg)
![[模型製作記] 福斯金龜車 1/24](https://attach.mobile01.com/attach/202410/mobile01-6e63f6eee1b74b1f9fedfab86021d200.jpg)
![[模型製作記] 福斯金龜車 1/24](https://attach.mobile01.com/attach/202410/mobile01-ff517cc43909a614b144b8c0119f4888.jpg)
![[模型製作記] 福斯金龜車 1/24](https://attach.mobile01.com/attach/202410/mobile01-e2ee6082684e9869ae87e1f7d501c3fb.jpg)
![[模型製作記] 福斯金龜車 1/24](https://attach.mobile01.com/attach/202410/mobile01-5f9dd354e97833163aa81e04e14beb2f.jpg)
![[模型製作記] 福斯金龜車 1/24](https://attach.mobile01.com/attach/202410/mobile01-570c11d16696db426752a986c551cc82.jpg)
![[模型製作記] 福斯金龜車 1/24](https://attach.mobile01.com/attach/202410/mobile01-3ecec36daa00cf09bd3d061ca27fe0e9.jpg)
![[模型製作記] 福斯金龜車 1/24](https://attach.mobile01.com/attach/202410/mobile01-d66509ed49cac8eb3f93dc7c38e8fbaf.jpg)
![[模型製作記] 福斯金龜車 1/24](https://attach.mobile01.com/attach/202410/mobile01-a128ec3929b402e8b98b8760118aca5e.jpg)
![[模型製作記] 福斯金龜車 1/24](https://attach.mobile01.com/attach/202410/mobile01-859f962b6bcefc249fe57c36c0721ac7.jpg)
![[模型製作記] 福斯金龜車 1/24](https://attach.mobile01.com/attach/202410/mobile01-75f90d2f9562e8ef0b3824d3469006e3.jpg)
![[模型製作記] 福斯金龜車 1/24](https://attach.mobile01.com/attach/202410/mobile01-93857142c2850917f30996e38c9aa92e.jpg)
![[模型製作記] 福斯金龜車 1/24](https://attach.mobile01.com/attach/202410/mobile01-0ec500355fa959edc4102c35f7375076.jpg)
![[模型製作記] 福斯金龜車 1/24](https://attach.mobile01.com/attach/202410/mobile01-125ea4113fa78319681d4cee6cc81d99.jpg)
![[模型製作記] 福斯金龜車 1/24](https://attach.mobile01.com/attach/202410/mobile01-bbc4bf584f9c392f4724c286397ace8e.jpg)
![[模型製作記] 福斯金龜車 1/24](https://attach.mobile01.com/attach/202410/mobile01-5531ef6ef7d0af892234b508fcf2b7c5.jpg)
![[模型製作記] 福斯金龜車 1/24](https://attach.mobile01.com/attach/202410/mobile01-f4703069790f4852f6d2bccec3dee720.jpg)
墊個東西,看一下鏡面效果,啊~真拍謝,淺色比較難看出來。
結語:
1. 跟上次麵包車工序相同,可點這裡參考。
2. 1/24比例已經很小了,不要問我鑰匙要插哪裡發動。
3. 小弟不回應任何製作技術與考證的問題,有問題跟我沒關係。
報告完畢,謝謝收看


 感謝分享&介紹,樓主大大的手藝真不是蓋的